
For me, apartment therapy has been the best kind of therapy since forever. From styling doll houses using leftover cloth pieces from the tailor, to designing interior spaces on the first computer mum dad bought back in 1997 to now, doing up my own space.
I have been excited to share the transformation of my living room area over the last few months.
Everything here is a budgeted alternative (I'll try and mention the source and cost of everything possible) , lots of Indian street market shopping and many DIYs..
Read on for a short living room tour...
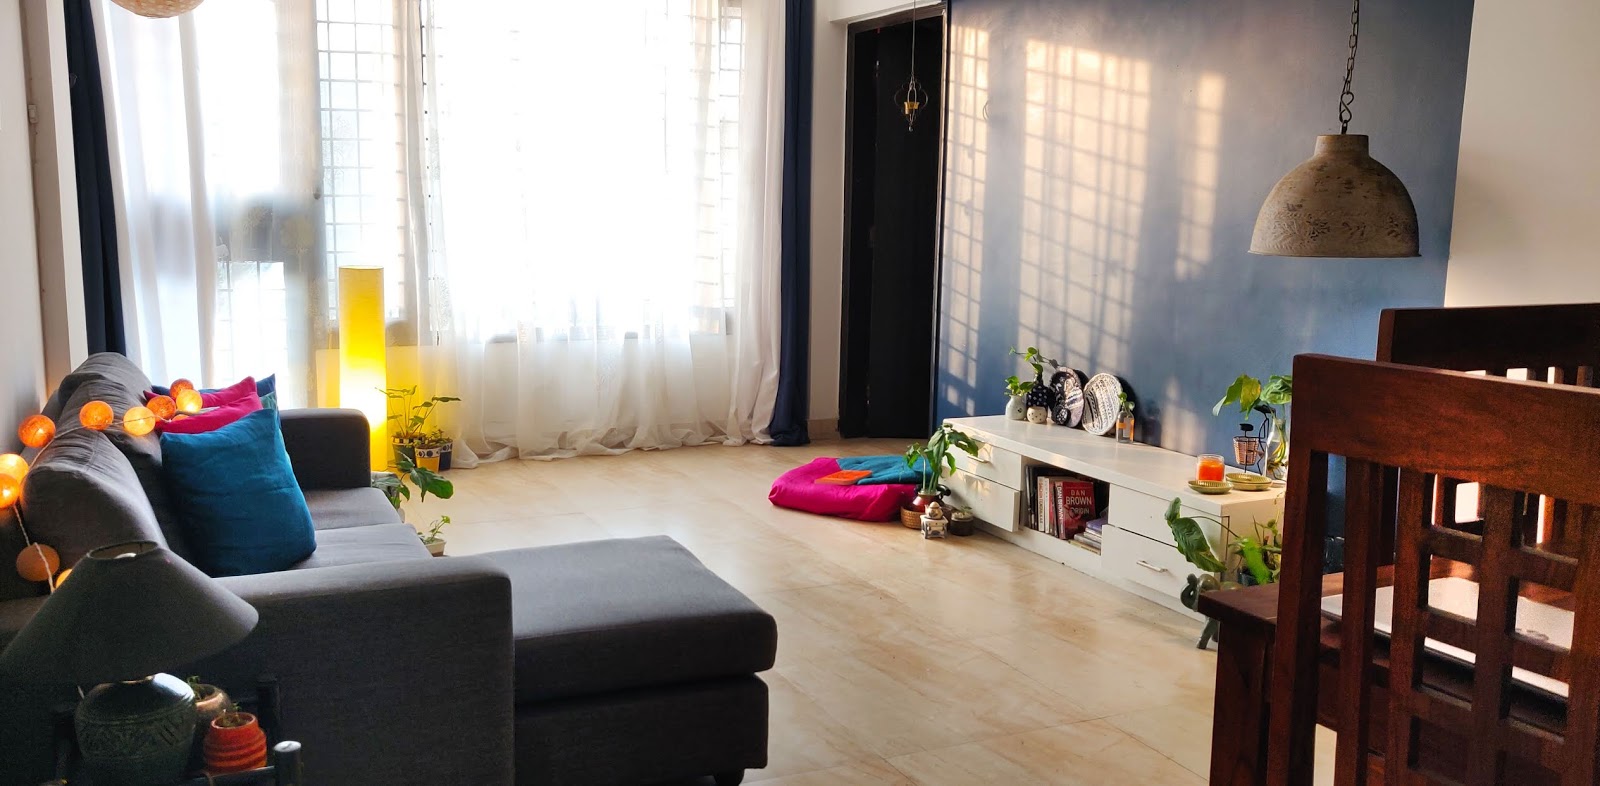 |
Last spring, this space looked like this (scroll down).. I had been caught up with work, and I had this wall area lying empty - since I felt we get a great (read GREATT) amount of daylight here in the afternoons, I wanted this to be the highlight of our home. I didn't want to rush through it. Also, since I run my own business - budgets are always wonky - so I wanted to do it up with a very small budget on hand.
 |
| Our Living Room shot from the left; back in March 2019 |
 | |
|
BEFORE AND AFTER

DIY #1
PAINTING THE WALL BLUE <3
The first thing I did was to choose the wall with the maximum daylight and paint it a bold color. I wanted a blue wall since my teenage years.. Quite frankly, since the time I watched 'Dil Chahtaa Hai'. You remember Sameer (Saif Ali Khan's) room? Yep, something like that. Haha!
So I walked across to the hardware shop, asked for the Asian Paints shade card.. Spent a good 20minutes and picked my shade. This was a water based paint, since it was my first time, I didn't want to be gutsy and go in for an oil based paint.

I chose the shade Armada : A subdued, deep, calm blue.

What all I bought for this DIY
A roller,
a paint rolling tray,
a 1 Litre pack of the wall paint,
1 roll of masking tape,
1 Medium Brush to use for the edges and sandpaper.

... after 1 coat, I have to admit, I was nervous, since this looked very patchy
and the color also looked much lighter than the chosen shade.

This is the next day, after a night of consuming sufficient amounts of coffee and
painting away obsessively .. After 4 coats. I stopped here at this point.
The final outcome!
I was very happy with the way the shade and consistency turned out!
And oh yes! The wall also matched the cane chairs I had painted with Acrylic and topped with synthetic varnish a year back!! This monochromatic composition was so satisfying.

Next up.....
DIY #2
Getting a reasonable side board and then painting it!
Furniture is usually expensive, and I did not want to invest in a brand new piece.
Also, I was sure I needed it to be white in stark contrast with the blue wall - with so many factors involved, I decided to get a second hand side board from OLX... and hand paint it myself.
I found a wooden one for Rs.2000/-.
 |
| It looked like this the day we bought it.. |
 |
| After sandpapering + 1 coat of White Enamel paint.. |
 |
| 3 coats.. freshly painted and ready to be accessorized.. (still to fix the broken handle) |
#3
Trip to Banjara Market and Sarojini Nagar
The very next day, while the side board dried... I was too excited to take a pause.
So, in the afternoon we went out on a short trip to Banjara Market in Gurgaon.
You can check out my blog post on Banjara Market for the details of what I bought and have they have to offer.
 |
| I bought this rustic, chic hanging lamp for Rs.600/- |
 |
| And these ceramic plates for Rs. 80-100 each. I really could have bargained better as an after thought!! |
#DIY 4
Paper Mache Wall Plates!!
This would by far be the most reasonable and fun DIY Project. All it required was glue, old newspapers and acrylic paint! That simple, I promise.
It's messy, it's fun, and it is super easy for kids as well as adults!
You can check out my DIY Paper Mache Plates Process on my blog post here.
 |
| Paper Mache - while it dried.. |
 |
| Final outcome.. |
#DIY 5
Stitching up the cushion covers with leftover suit piece cloth..
Every change of season while I would open up my box bed, I would see these old cloth pieces which were to be used to get Indian Kurtas stitched. I had got these from Lajpat Nagar about a decade ago.
I decided this time, that either I get them stitched or I give them away! I have promised myself I will not be hoarding, and I am working hard on that ;)
Just then it struck me that I knew the basics of stitching. And I had bought a small stitching kit from Miniso. Within minutes I got down to trying my hand at making these vibrant cushion covers. It took me hours to hand stitch these babies - but the overall outcome was so totally worth it!! I may add tassles too if I find some nice ones in the future.
These instantly brightened the place up - while they left me feeling so satisfied that I had put that old old stuff to great use!
 |

#DIY 6
Fairy lights and pickle / mason jars! A match made in heaven!

Diwali has gone by, and just like every other festive season - I never feel like removing the fairy lights. So this time, I just collected all the old 'achaar' (pickle) jars, cleaned them up - and placed the lights into them. I have placed these in various corners of my home - and they give such a soothing, wintery vibe!
That's it for now!
Here are some more before and after & behind the scenes snaps of our apartment.
Do comment below and share this post if you liked or tried out any of these quick DIYs to liven up your space!
 |
| my larger than usual canvas.. |

 |
| the mess that it was... |
 |
| plants make any space prettier.. |
 |
| using all old beer and cold coffee bottles as planters.. |
 |
| paper mache love <3 Crushing on the texture and pattern! |
 |
| thank you, Starbucks! |
 |
| trying out swatches to decide what I wanted to paint on the paper mache wall plates.. |
 |
| ..blooming corners of my home.. |
 |
| Clay Mache Haathi from FabIndia |
 |
| 'back then' snaps to remind me how dark and messy it all looked before the transformation.. Every little change makes such a huge difference! |
 |
| Lamp from Sarojini Nagar for Rs. 200/- only. |
 |
| a cosy reading nook accessorized by a chai kettle I painted many years back.. |
Thank you!
follow me https://www.instagram.com/vsharma.design/ for more DIY and home interior updates.
Comments
Post a Comment